Monday, August 26, 2013

A Little Something from My Crafty Past


Hey Everyone.

Elizabeth here this week. Sharing a bit of my crafty life with you … well … more like my past crafty life.  But hey, everything old becomes new again, right? I’ve been so busy the last few weeks getting the child ready to leave for college that I haven’t had any chance to be personally crafty.  So you dear reader get to see something “vintage”.  LOL.

This mini-album is a little something I designed few years ago for a class I taught at a LSS.  When I got finished with it I was I.N. L.O.V.E. Totally and completely.  I even didn’t mind the less than perfect handwriting. Shocker!  There really isn’t any concrete theme to the album … just “Odds & Ends. Bits & Pieces.” like the cover says.  Hopefully some of the pages and/or handmade embellishments will inspire you to create a mini-album of your own full of randomness.


Album Cover
I used layered circle flowers, sparkly tulle, silver brads, lace and ribbon throughout the album for continuity.  I like setting the stage for their use on the cover … gives the reader a taste of what’s to come.


Our Story Began …
These two pages tell of how my husband and I met.


Our Home Is …
This is where we live.


Happy Is …
A short list of what makes our family happy.


Our Family Is …
Here I included a short description of our family.


It’s All Good …
One word: football.


Together Is …
“… much sweeter because of the time we’ve had to spend apart.”


A Few Simple Facts …
Just more superfluous info about our family.


One Favorite Place …
One word: Germany.  


Dear Friends …
We aren’t fortunate to have family near us so we have made our dear friends part of our family.  


Untitled Page and Inside Back Cover …
A spot for two more random pix and the date the album was made.  A must for me.  I think every album should include the completion date.


Well, there it is. Random mini-album by Elizabeth.  I hope you enjoyed the look into the odds & ends of my life. Speaking of which, I’m going to get back too.  My family and I are currently enjoying some vacation time about a quarter of a mile west of Sundance.  A cabin in the woods with internet and satellite TV. This is my kind of camping!


signature

Saturday, August 17, 2013

Stitching on a layout

Hi friends!

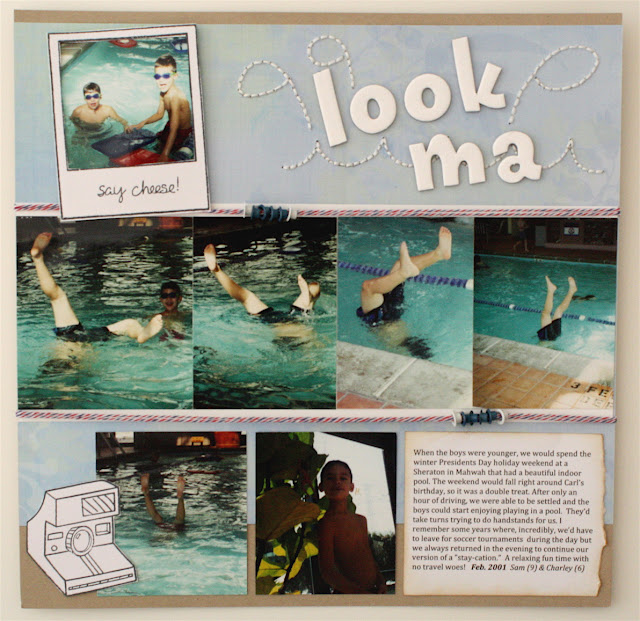
Cindy here with a layout that I created recently with pictures from when my boys were younger and we used to take them on an annual stay-cation in February.

I thought it would be fun to stitch something under my title and since the pictures were of my boys swimming, I chose to highlight their watery splashes.

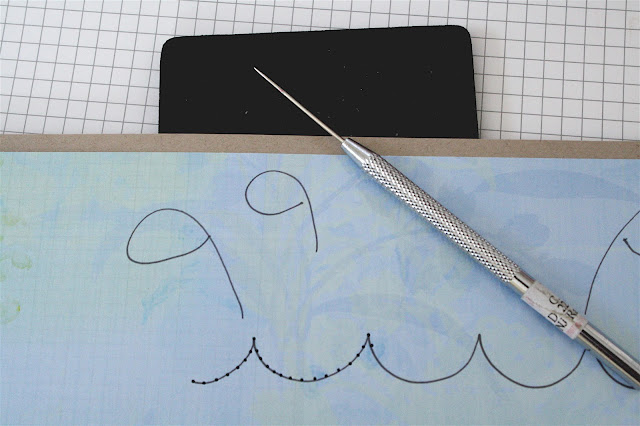
I completed my layout, leaving room on top for the title. Using a Sharpie, I drew waves and splashes in large sweeping lines. (It's easier to stitch something large!)


Then I used my paper piercer to poke holes equally spaced along the drawn lines.


I threaded up a cross-stitch needle with white floss and starting from the back, I backstitched along the lines. (If you leave a long tail in back when you start, you can proceed to slowly stitch over it to anchor it in place.)


Once I completed all the lines, I added my Thickers title on top. If I'd thought more about it when I was planning the stitching, I may have wanted to use a white gel pen to draw the lines since I was going to be stitching with white floss. Something to consider next time.


I used a Lawn Fawn stamp set called Say Cheese for the polaroid and camera images. Aren't they adorable? (Since making this layout, they've come out with a die to match their polaroid stamp. So cool.) Oh and one other little feature: I threaded blue and white eyelets on my long lengths of twine in the middle to mimic the swimming lanes in the pool. *smile*

I hope this puts you in the mood to do a little stitching on your next layout.

Thanks for dropping by and....

signature

P.S. We'd love to hear your comments and come chat with us on Facebook, as well. You never know when a prize may be awarded to a random commenter, here or there! :-)

Monday, August 12, 2013

Nancy's Birthday Album


Carla here today, with a special project for a special friend! 

I met Nancy though my running club, and we immediately hit it off. As it turns out, pretty much everyone who meets her feels that way; one of our other friends from the club calls Nancy "everybody's best friend."  So when Nancy turned 50, I knew I had to give her something out of the ordinary.  I decided to create a theme album, with input from our group of friends:  “50 things we love about Nancy.”  

I was inspired by Graphic 45’s Olde Curiosity Shoppe line, because its vintage look and amusing icons suit Nancy’s quirky nature.  I decided on an 8 x 8" album, with two “things we love” per page, for a total of 25 pages -- plus a cover page and a few additional pages at the end for her friends to sign the book.

To number the "50 things," I wanted to use my Tim Holtz Idea-ology wooden game pieces, because Nancy likes to play bingo.  But I couldn’t include 50 thick wooden pieces that way, because they'd create way too much bulk. So instead, I found an image of the numbered pieces online, and printed it on cardstock.  I punched out the circles in sequence as I created the album, and I used thin 1/16” foam dots to give them just a little dimension without making the book too thick.  I varied the paper from page to page, but tried to keep the layouts simple for faster assembly, and to allow the photos and journaling to take center stage.

I was pleased with the finished album -- and Nancy clearly was, too!  I had a lot of fun with the cover, but I still need to photograph it (if Nancy lets me borrow it back!), so that will be a separate post for another time!  Here are a few pages from inside the book, starting with the title page.


It was a real joy to make this album, because I knew Nancy would appreciate it.  Have you done a theme album like this for someone? Tell us about it, and/or link us to it!

Paper:  Graphic 45, K&Company, ephemera & paper scraps from my stash
Stickers:  7 Gypsies, Martha Stewart Crafts, Echo Park, EK Success
Circle Punch and Circle Cutter:  EK Success

p.s.  Edited 10/26/13 to add the cover:


signature

Friday, August 2, 2013

My Crafty Storage

Big hello....Darlene here!

After a ton of research I finally found some crafty storage solutions that work for me.
Punches were always and issue for me but this seems to be working great provided I don't get any more. My scrapbook space has two cabinets so I made one for all my Martha Stewart Punches and the other cabinet is for the rest of my punches. My wonderful husband cut me several 2 x 4's to use as risers on the shelves. Now I able to put my punches to good use since the are so much easier to find.


Lenore, another "Crafting Journals" contributor had given me this idea for storing my 12 x 12 paper pads. I put them all in a jumbo freezer baggie along with any matching embellishments. I won't tell you how many containers like this I have.


signature

Thursday, August 1, 2013

Birdhouse Beauty

Lately, I have been making a lot of handmade cards. This past year for my sister's birthday, I made her a collection of handmade greeting cards along with a beautiful box to store them all in. Every few months, I send more cards her way to add to her box.

Here is an adorable card featuring a fun digi stamp from Sassy Cheryl's Stamps collection. This card measures 4.25" x 5 1/2". K & Co. papers are used for matting on a white cardstock base. A decorative punch was use to make the border. The coloring was done using Copics.


Birdhouse: BG01, BG05
Roof: E31, E33, E15, E18
Flower Pot: Y21, YR15
Bird: BG13, BG15
Leaves: YG61
Flowers: Variety


signature